
Technical SEO is the backbone of every high-ranking website. No matter how great your content is, if your site is slow, difficult to crawl, or full of technical issues, search engines won’t rank it where it deserves to be.
Think of it this way: If your website were a car, technical SEO would be the engine. You might have the best-looking site, but if it’s slow, hard to navigate, or full of hidden errors, search engines won’t prioritize it.
This guide dives deep into everything you need to know about technical SEO – from improving site speed to fixing crawl issues, implementing schema markup, and optimizing for mobile.
By the time you’re done, you’ll have a rock-solid SEO foundation that search engines (and users) will love.
Let’s get started!
Table of Content
- Technical SEO Checklist
- 1. Site Speed Optimization
- 2. Mobile Optimization
- 3. XML Sitemaps
- 4. Robots.txt and Crawling Control
- How to Configure Robots.txt
- 5. HTTPS and Website Security
- 6. Structured Data and Schema Markup
- How to Implement Schema in WordPress
- How to Implement Schema on a Custom Website
- 7. Canonical Tags and Duplicate Content
- 8. Site Architecture and Internal Linking
- 9. URL Structure
- 10. 404 Errors and Redirects
- Is On-Page SEO the Same as Technical SEO?
- Frequently Asked Questions
- Conclusion
Technical SEO Checklist
1. Site Speed Optimization
Why Site Speed Matters
Site speed directly impacts user experience and SEO rankings. Slow-loading pages leads to higher bounce rates and poor user engagement. Meaning, that users exit your site earlier, without even viewing your content.
Google has confirmed that page speed is a ranking factor, and with mobile-first indexing, speed optimization is more important than ever.
Image Optimization
Large image files significantly slow down your website because they increase the load time, leading to a poor user experience and higher bounce rates.
If the images aren’t optimized, they create a heavier network load, especially on mobile networks, which results in slower page loading.
To prevent it, you can compress images to make their file size smaller. Also, you can use modern image formats such as WebP or AVIF which support better compression.
Tools for Image Compression
- TinyJPG: Compresses JPG and PNG images without losing quality.
- ImageOptim: An effective tool for Mac users to reduce file sizes of images.
- Squoosh: A free browser-based tool for image optimization.
Enable Caching
Caching stores static resources like images, JavaScript, and CSS files, so visitors don’t need to download them again each time they visit.
This results in faster page loads for returning users.
Caching is especially important for sites with a lot of traffic, as it reduces the load on the server.
Tools for Caching
- WP Rocket: A popular caching plugin for WordPress that offers a one-click solution for performance improvement.
- Cloudflare: Provides a CDN that also caches static content.
2. Mobile Optimization
Why It’s Critical
With mobile-first indexing, Google primarily uses the mobile version of your site to rank pages.
If your mobile version is slow or doesn’t work well, your rankings could drop.
Poor mobile optimization also leads to higher bounce rates, as users will abandon a site that’s hard to use on their phones.
Best Practices for Mobile Optimization
- Responsive Design: Ensures that your site adapts to all screen sizes, making it easier for users to navigate regardless of device. This approach improves user experience and can boost SEO.
- Touch-Friendly Navigation: Buttons, links, and menus should be large enough for users to click on touch devices, reducing frustration and improving engagement.
3. XML Sitemaps
What Is an XML Sitemap?
An XML sitemap is a list of all the pages on your website that you want search engines to crawl and index.
It acts as a roadmap for search engines, helping them understand the structure of your website and find new pages faster.
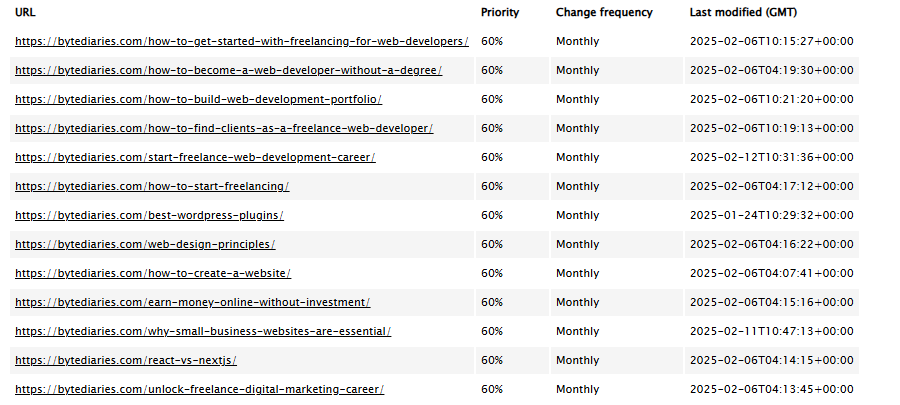
For example, you can view a sitemap of Byte Diaries in the image below:
Generally, the sitemap is placed at:
https://<yourdomain>/sitemap-index.xml or https://<yourdomain>/sitemap.xml
How to Create and Submit Sitemaps
Creating an XML sitemap manually might sound complicated, but different tools make it easy to generate one automatically.
For example, if you are using WordPress, there are plenty of plugins to generate sitemaps such as Yoast SEO, XML Sitemap Generator, etc.
But, if you have a custom-built website, you can use tools like XML Sitemaps. It generates a .xml file that you can download and upload on your server.
Once the sitemap is created, submit it to Google Search Console so that search engines can crawl and index your content more effectively.
4. Robots.txt and Crawling Control
What Is Robots.txt?
The robots.txt file is a small text file placed in the root of your website that tells search engines which pages they should or shouldn’t crawl.
It’s a useful tool for controlling access to your site’s content.
You can view robots.txt of any site at: https://<domain>/robots.txt
For example, you can view the robots.txt file on YouTube in the image below:
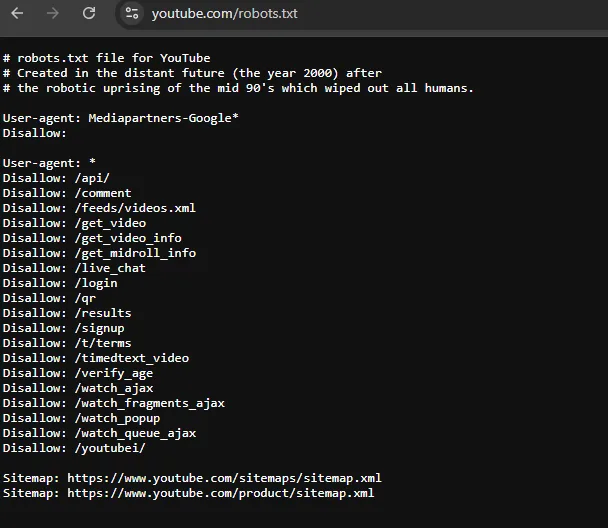
I have no idea what the third line of the above image is trying to say.
How to Configure Robots.txt
Block Unnecessary Pages
Not every page on your website needs to be crawled by search engines. For example, you might want to block search engines from crawling your Thank-You pages, admin areas, or non-indexed content like duplicate pages.
By doing this, you save your crawl budget – the number of pages search engines crawl on your site – and ensure they focus on your most valuable content.
Syntax for Disallowing Pages
To block search engines from crawling specific pages or directories, you use the Disallow directive in your robots.txt file. For example:
User-agent: *
Disallow: /thank-you/
Disallow: /admin/
Disallow: /duplicate-page/
This tells all search engines (user agents) not to crawl the pages in the specified directories.
Allow Necessary Pages
You’ll generally want search engines to index all your main pages, but sometimes it’s not practical to list every single page in your robots.txt file.
Instead, you can rely on your XML sitemap, which contains links to all the pages you want indexed.
This way, you don’t have to manually list each page in the robots.txt file. Just ensure your sitemap is up-to-date and submitted to Google.
Syntax for Allowing Pages
To explicitly allow search engines to crawl certain pages, you can use the Allow directive.
This can be helpful if you’ve blocked an entire directory but still want search engines to crawl specific files or pages within it:
User-agent: *
Disallow: /private/
Allow: /private/important-page/
In this example, the entire /private/ directory is blocked, but the “important-page” is allowed to be crawled.
5. HTTPS and Website Security
Why HTTPS Is Important
Having HTTPS is a must for both SEO and security.
HTTPS signals to search engines that your site is trustworthy and secure.
Google gives an SEO boost to secure websites, and it also protects sensitive user data (such as passwords and credit card details).
You can use either free or paid SSL certificates to secure your website with HTTPS. If you’re not technically inclined, you can ask your developer to implement the SSL certificate for you.
6. Structured Data and Schema Markup
What Is Schema Markup?
Schema markup is a form of structured data that helps search engines better understand the content on your website.
It provides more context to your pages, which can enhance your search engine listings with rich snippets, such as star ratings, images, and other useful information.
Types of Schema to Implement on a Website
- Article Schema: Helps Google recognize and rank your blog posts more effectively.
- Product Schema: Ideal for e-commerce sites to highlight product details like price, availability, and reviews directly in search results.
- FAQ Schema: Perfect if your web page has content in a question-answer format. Helps search engines understand and present your FAQs more effectively.
- Review Schema: Allows you to showcase customer reviews and ratings directly in search results, improving trust and engagement.
- Event Schema: Ideal for event-based websites, allowing event details like time, location, and ticket prices to appear directly in search results.
- Breadcrumb Schema: Helps search engines understand your website’s structure and display breadcrumb navigation in search results.
- People Schema: Provides detailed information about a person (e.g., author, business owner, or employee), helping search engines recognize and display key info.
- How-to Schema: Ideal for instructional content. Helps search engines display step-by-step guides in rich results.
- Job Posting Schema: Used for job listings, enabling details like job title, location, and salary to appear directly in search results.
- Organization Schema: Provides structured data about your organization, such as name, logo, and contact information, improving your site’s representation in search results.
- Video Schema: Helps search engines understand video content and display video-rich snippets in search results.
- Local Business Schema: Ideal for local businesses, providing important information such as location, hours of operation, and contact details directly in search results.
Tools for Implementing Schema
- Google’s Structured Data Markup Helper: Great for beginners to easily generate schema code for their website.
- Schema Pro: A plugin for WordPress users that simplifies schema markup implementation.
- Schema Markup Helper: A free and easy-to-use tool to generate schema markup.
How to Implement Schema in WordPress
1. Use a Plugin
The easiest way to implement schema on a WordPress website is by using plugins like Yoast SEO, Schema Pro, or Rank Math.
These plugins provide an intuitive interface for adding structured data to your posts, pages, and other content.
2. Automatic Implementation
Once installed and configured, these plugins will automatically add schema markup to your content based on the type (e.g., Article, Product, FAQ).
You just need to select the relevant content type in the plugin settings.
3. Custom Schema
If you need a custom schema, you can add it manually by using custom fields or by editing the theme’s files.
This is a more advanced option, so make sure you’re comfortable with coding.
How to Implement Schema on a Custom Website
1. Manual Addition
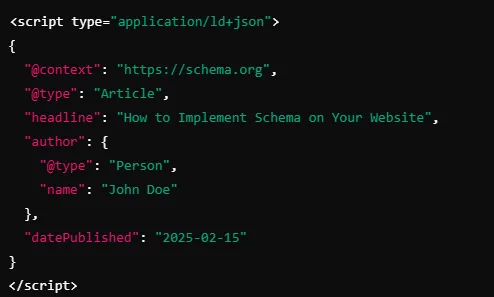
For a custom website, you’ll need to manually add schema markup. Identify the type of schema you want to implement (e.g., Article, Product, FAQ) and include the appropriate JSON-LD code in the <head> section or directly within the content.
Schema is not visible to your audience. It is only for search engine bots.
Example (JSON-LD for Article Schema):
2. Use Schema Markup Generators
If you’re unsure how to write schema code manually, you can use schema markup generators (e.g., Schema Markup Generator) to create the structured data and then add it to your website’s code.
3. Validate Your Schema
After implementing the schema, make sure to validate it using the Google Rich Results Test or Schema Markup Validator to ensure it’s correctly implemented.
7. Canonical Tags and Duplicate Content
What Are Canonical Tags?
A canonical tag is an HTML element that helps prevent duplicate content issues by specifying the preferred version of a web page.
It tells search engines which URL to consider the main source when similar or identical content appears on multiple pages.
If you have several versions of a page (like a product page with multiple filter options), you risk Google treating them as duplicate content.
For example, Google considers https://mywebsite.com/products?sort=’date’ and https://mywebsite.com/products?sort=’price’ as different pages while both URLs are on the same page.
To prevent such issues, we need to use canonical tags.
Canonical tags help tell search engines which version is the main one. This prevents content duplication issues that could negatively impact SEO.
Example of Canonical Tag Usage
<link rel=”canonical” href=”https://mywebsite.com/products” />
8. Site Architecture and Internal Linking
Why Site Structure Matters
A well-organized site structure is critical for both SEO and user experience. Search engines rely on your site’s architecture to crawl and index your pages efficiently, and users need to be able to easily navigate your site to find the information they are looking for.
A clean, logical site structure enhances your SEO by ensuring:
- Clear navigation: Easy-to-follow menu options that help users find what they need.
- Consistent URL formatting: Helps search engines understand relationships between pages.
- Logical hierarchy: This makes it easier for both search engines and users to identify the most important pages of your site.
Benefits of a Good Site Structure:
- Better user engagement and retention.
- More efficient crawling and indexing by search engines.
- Improved rankings for important pages, as internal links pass authority.
Internal Linking Tips
- Link to Important Pages: When linking internally, prioritize your cornerstone content or high-value product pages.
These are the pages you want to rank higher in search results. Linking to them from other pages helps boost their authority.
For example, if you’re writing a blog post on a specific topic, link to your most important service pages or guides to enhance their visibility.
- Use Descriptive Anchor Text: Anchor text should give both search engines and users a clear idea of the linked page’s content.
For example, when linking to our SEO basics guide, we use the anchor text “SEO basics guide” rather than generic text like “click here” or “read more”.
This makes it clear what the reader will find and helps search engines understand the relevance of the linked content.
Common Mistakes to Avoid:
- Overuse of exact-match keywords: It’s tempting to stuff anchor text with exact-match keywords, but it can come off as spammy. Be natural and relevant.
- Using generic words: Words like “click here” or “see more” don’t provide any contextual value for SEO and should be avoided.
Tip: Tools like Ahrefs or SEMrush can help identify which pages on your site have the most backlinks, making them excellent candidates for internal linking to boost their authority.
9. URL Structure
Best Practices for URL Structure
Keep It Short and Descriptive
URLs should be easy for both users and search engines to read.
A short URL is easier to share, and search engines prefer URLs that are clear and to the point.
For example, instead of example.com/blog/2025/02/article-about-seo, use example.com/seo-guide.
Why URL Length Matters:
- Short URLs are more likely to be shared on social media.
- Clear URLs improve click-through rates (CTR) in search results.
- They help users remember and type URLs more easily.
- Include Keywords: When possible, include your primary focus keywords in the URL.
Including keywords gives search engines and readers a better understanding of what the page is about, which can boost rankings for those terms.
For example, use example.com/technical-seo-guide instead of example.com/page1.
Additional Tips for Structuring URLs:
- Avoid using unnecessary parameters or numbers that don’t add any SEO value.
- Use hyphens (-) to separate words in the URL, as underscores (_) can be read as one long word by search engines.
For example, if your URL is https://mywebsite.com/article_on_seo_guide
Search engine crawlers read it as “articleonseoguide”, which makes no sense.
But, if your URL is https://mywebsite.com/article-on-seo-guide (separated by – not _ )
Search engine crawlers read it as the “article on seo guide”, which makes sense.
10. 404 Errors and Redirects
How to Fix 404 Errors
404 errors occur when users try to access a page that no longer exists or has been moved without a proper redirect.
These errors can harm the user experience and negatively impact your site’s SEO, as they interrupt the user journey and lead to frustration.
Why 404 Errors Matter for SEO:
- 404 errors send a “signal” to search engines that a page is no longer available, which can affect your site’s crawlability and indexing.
- Broken links and 404 errors can create a negative user experience, causing visitors to leave your site, and increasing your bounce rate.
How to Fix 404 Errors:
- Identify broken links: Use tools like Google Search Console, Screaming Frog, or Ahrefs to regularly scan your site for 404 errors.
- Fix or remove broken links: If a page has been deleted and you no longer need it, make sure it’s removed from your internal links. If it’s necessary, fix the links or create a redirect to a relevant page.
Redirecting Pages
- Use 301 Redirects: A 301 redirect is a permanent redirect that tells search engines and users that a page has permanently moved to a new URL. This ensures you don’t lose valuable SEO juice when removing or moving content.
When to Use a 301 Redirect:
- When you’re restructuring your website and changing URLs.
- When you’re consolidating multiple pages of similar content into one.
- When migrating content to a new domain.
Why Relevance Matters:
Ensure that the destination page for the 301 redirect is relevant to the content.
Redirecting users to an unrelated page can cause confusion and hurt user experience.
For example, redirecting a blog post about “SEO basics” to a page about “web hosting” would be misleading.
Additional Tip: Regularly check your 301 redirects to make sure they still point to the correct pages and haven’t been broken or outdated.
Lastly, I’ve found that many beginners often get confused about the difference between On-Page SEO and Technical SEO. To simplify things, here’s a simple comparison to help clarify the two:
Is On-Page SEO the Same as Technical SEO?
On-page SEO and Technical SEO are closely related but focus on different aspects of optimizing your website.
Understanding the distinction between the two can help you improve your site’s visibility in search engine results.
On-Page SEO
On-page SEO refers to the strategies and techniques that are directly applied to individual pages on your website.
It focuses on optimizing content, HTML tags, and multimedia elements to make a page more attractive to both search engines and users.
Key Elements of On-Page SEO:
- Content Optimization: Writing high-quality, informative content with well-researched keywords.
- Title Tags and Meta Descriptions: Crafting unique and compelling title tags and meta descriptions for each page.
- Headings (H1, H2, etc.): Using appropriate headings to structure your content and make it easier for users and search engines to understand.
- Internal Linking: Linking to other relevant pages on your site to enhance the user experience and spread link equity.
- Image Optimization: Compressing images and using descriptive alt tags for better accessibility and faster load times.
- URL Structure: Creating short, descriptive, and keyword-rich URLs.
On-page SEO is all about making sure each page is optimized to attract organic traffic and is easily understood by search engines.
Interested in optimizing your page and getting it ranked? Read our full guide on on-page SEO.
Technical SEO
Technical SEO, on the other hand, focuses on improving the technical aspects of your website that affect how search engines crawl and index your site.
It ensures that your site is accessible, well-structured, and performing optimally in terms of speed, security, and mobile-friendliness.
Key Elements of Technical SEO:
- Site Speed: Ensuring your website loads quickly, which is essential for both user experience and search rankings.
- Mobile-Friendliness: Making sure your website is fully optimized for mobile users.
- Crawlability: Ensuring search engines can crawl and index your pages by using robots.txt, sitemaps, and fixing crawl errors.
- Schema Markup: Implementing structured data to help search engines understand your content and display rich snippets in search results.
- SSL/HTTPS: Securing your website with an SSL certificate to protect users and boost rankings.
- Fixing 404 Errors and Redirects: Properly managing broken links and redirects to maintain link equity and user experience.
Technical SEO is more about the technical aspects of your website that ensure it functions correctly and is accessible to search engines.
Key Differences:
- On-page SEO is focused on content and the elements within each page, while Technical SEO deals with the website’s infrastructure and how well it operates for search engines.
- On-page SEO is more user-facing, whereas Technical SEO deals with the behind-the-scenes elements that influence crawling, indexing, and site performance.
Both On-Page and Technical SEO are essential for a well-rounded SEO strategy.
On-page SEO ensures that your content is high-quality and relevant, while Technical SEO makes sure that your site is technically optimized and easy for search engines to crawl and index.
By focusing on both aspects, you can improve your site’s visibility, user experience, and overall search engine rankings.
Frequently Asked Questions
1. What is technical SEO?
Technical SEO refers to optimizing a website’s infrastructure to help search engines crawl, index, and rank it efficiently. It includes factors like website speed, mobile-friendliness, structured data, XML sitemaps, and security (HTTPS).
2. What is technical SEO vs on-page SEO?
Technical SEO focuses on improving a website’s backend performance, ensuring better crawlability and indexing. On-page SEO, on the other hand, involves optimizing content, keywords, meta tags, and internal linking to improve relevance and user experience.
3. How to check technical SEO?
You can check technical SEO using tools like:
- Google Search Console (crawl errors, indexing issues)
- Lighthouse & PageSpeed Insights (site speed, mobile usability)
- Screaming Frog & Sitebulb (broken links, duplicate content)
- Ahrefs & SEMrush (technical audits, backlinks, and more)
4. Does technical SEO require coding?
Basic technical SEO doesn’t require coding, but knowledge of HTML, CSS, and JavaScript can be helpful when implementing structured data, fixing indexing issues, or optimizing page speed.
5. How to fix SEO issues?
To fix SEO issues:
- Improve site speed by compressing images and enabling caching
- Ensure mobile-friendliness with a responsive design
- Fix broken links and 404 errors with redirects
- Optimize robots.txt and XML sitemaps for better crawling
- Implement structured data (schema markup) for rich results
6. How do I master technical SEO?
To master technical SEO:
- Learn from trusted sources like Google Search Central, Moz, and Ahrefs
- Use SEO tools like Screaming Frog, Google Search Console, and Lighthouse
- Stay updated with algorithm changes and best practices
- Practice optimizing websites and running technical audits
Conclusion
Implementing effective technical SEO ensures that search engines can crawl and index your site efficiently while providing a smooth and fast experience for your users.
By following the tips and using the tools mentioned in this guide, you’ll not only improve your rankings but also enhance the overall user experience, leading to increased engagement and conversions.